Sunday, March 28, 2010

GYPSY WOMAN NECKLACES

GYPSY WOMAN NECKLACES


Goddess Ceremonial Custom necklace for Judy Bechtold - "Homestead Horsewoman" -

I’ve had so much fun creating my Goddess necklaces through the years. When I first started making them, I thought they should be worn by very tall women, like myself, since they are ornate and elaborate. After selling them at my shows I found, to my delight, that ALL women seem to look good wearing my necklaces! I noticed that a strange thing seems to happen to the women who try them on. First they seem to be ordinary women but once the necklace goes over their heads..they become flamboyant gypsies! So, with that in mind. I am going to start a new series titled, “Gypsy Necklaces.”

Gypsy Trish

It’s logical that the necklaces would evolve to becoming gypsies. I have named other items I make “Gypsy” like my “Gypsy Woman Journals.” I think the real inspiration to change the necklaces though, came from Pam Aries of Aries Gypsy. Not only am I captivated by the gypsy music she plays on her blog but she recently showed a video of a gypsy caravan that conjures up memories I haven’t even experienced. Well, not in this lifetime anyway!

I’ll be posting my new Gypsy Woman Necklaces soon. I think they will be similar to the Goddess necklaces only much janglier and well, gypsyish!

In the meantime, I have this Goddess Ceremonial Necklace titled “She Who the Ocean Beckons” available for $125.

She Who the Ocean Beckons Necklace

I also have this Gypsy Woman journal available for $89. Since I take all the credit cards (or checks) you can e-mail me if you are interested in purchasing from me direct or you can go through Paypal on Etsy.


Gypsy Woman Journal

If you haven’t had a chance to review the recipe for lasagna that my chef friend, Wayne, gave to me to post, you may want to check it out. I am giving away a pasta maker to celebrate that wonderful recipe. You have till March 31st to make a comment. Thank you so much for participating.

Stumble Upon Toolbar

Tuesday, March 23, 2010

CHEF WAYNE'S "LAST MEAL" LASAGNA

CHEF WAYNE’S “LAST MEAL” LASAGNA


The "Last Meal" Lasagna

So many people have asked me for the recipe for my lasagna, (which isn’t mine at all) that I knew I had to publish it. Wayne St. Clair, the real creator of this recipe, gave me permission to feature it on my blog. This dish is so good, one person said after partaking of a huge helping, “If I had to choose one dish as my last meal, this would be it!”

About the same time that I decided to post this recipe, a representative of CSN Stores offered to sponsor a giveaway through my blog. CSN offers products ranging from exercise equipment and pet supplies to furniture, housewares and kids bedding. They let me pick the item to be given away. As befits a blog post about making lasagna, I decided on – a pasta maker! There’s no pasta tastier than fresh, homemade pasta.

Cucina Pro Pasta Fresh Machine

All you have to do to have a chance of winning this handy appliance is make a comment at the end of this post. If you have a blog or a page on Facebook, Myspace, Flickr, or Twitter, it would be nice if you’d create a link to this post, http://healingwoman.blogspot.com/2010/03/chef-waynes-last-meal-lasagna.html , as well. And if you’re the lucky winner, you can use your new pasta maker for this recipe (although this last step is optional). You will have until March 31st (1 week) to make a comment on this post. I will announce the winner on Thursday, April 1st. The selection will be made with a random number generator.

I don’t want to scare you away from trying this delicious dish, but you may find it to be a test of your kitchen stamina. You must make some of the recipe’s components several days in advance, so it requires a bit more planning than many of the recipes I’ve posted before. Believe me, it is worth all the effort!!!

PS: Wayne never writes his recipes down. We are really lucky to get this one!

Here goes. Good luck!

Lasagna with Spinach Noodles and Homemade Ricotta Cheese

5 pounds tomatos, Heirlooms like Cherokee Purple are perfect
9 cloves garlic, minced
1 large sweet red pepper, roasted and peeled
1 large onion, diced
1/4 cup red wine vinegar
water , as needed
½ teaspoon kosher salt
1 teaspoon cracked black pepper
1 teaspoon crushed red pepper flakes
1 tablespoon dried oregano
2 tablespoons extra virgin olive oil
3 whole bay leaves
1 pound hot Italian sausage, bulk not links
1 pound sweet Italian sausage, bulk not links
1 gallon whole milk
1 quart heavy cream
4 whole lemons, juice and zest
12 whole basil leaves, sliced thin
½ teaspoon kosher salt
12 oz. frozen spinach, squeezed dry and chopped fine
1 teaspoon kosher salt
2 tablespoons extra virgin olive oil
3 large eggs
3 ½ cups flour, or more as needed
1 pound shredded mozzarella cheese

"This is a very complex lasagna with a lot of steps but the results are worth it. One comment I got after serving it was that you tasted something different with each bite. Even cold the next day it is lighter than the standard lasagna. After reviewing though I can honestly say the only step that you can leave out if you must is making the noodles. Standard store bought noodles will work but the results won't be as light...a word you rarely associate with lasagna. But if you have a pasta machine I would recommend making the spinach noodles...but by no means substitute store bought pasta sauce or ricotta cheese...making your own makes all the difference in the world.

"Its funny. I did not realize just how many steps are required to make this dish until I wrote out this recipe for Cheryl...its a lot of work but the work can (and should) be stretched out for several days and the results are definitely worth it."

MAKING THE SAUCE

I highly recommend making this sauce from heirloom tomatoes like Cherokee purple or Brandywine or even a good hybrid like Carolina Golds...which would make a very pretty orange sauce.

(1) Core the tomato stems out with a melon baller and score the bottoms with an X.

(2) Bring 1 1/2 gallons of water to a boil and drop the tomatoes in a few at a time and blanch for about a minute then remove and drop into cold water. Repeat until all of the tomatoes are done.

(3) Peel the tomatoes and quarter to remove as many seeds as possible then dice and place in a bowl and sprinkle with the salt.

Cherokee tomatoes

Par-boil tomatoes

(4) Roast the sweet red pepper either on a gas burner or under the broiler until well charred on all sides...place in a bag or covered container and allow to steam for about 15 minutes then rinse off the char and dice.

(5) Heat the olive oil over medium heat in a large sauce pan or dutch oven. Add the garlic and crushed red pepper flakes and allow to cook in the oil briefly...for no more than a minute stirring frequently then add the onions and pepper and saute until the onions wilt. then add the tomatoes.

(6) Simmer the tomatoes stirring frequently until they release their moisture...add the pepper, the bay leaves and the oregano and any water...1/2 cup a a time as needed. Transfer to a slow cooker and add the red wine vinegar and bring to a simmer and cook for 4 or 5 hours until the sauce thickens...cover and refrigerate.


Roast Red Bell Pepper


Steam Red pepper


Saute Onions and garlic
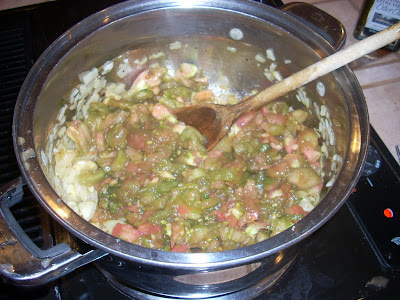

Add tomatoes

FINISHING THE SAUCE

Allow the sauce to sit in the refrigerator for 2 or 3 days to allow the flavors to marry.

(7) Take 3/4 of the sauce out and puree then fold back into the remaining sauce.

(8) Crumble the hot Italian sausage and brown until done then drain off the grease and fold into the sauce.

(9) Repeat with the sweet Italian sausage and refrigerate.

Saute both sausages together


Add sausage to the sauce

MAKING THE RICOTTA

"As far as I am concerned this is the most important ingredient and not one to be replaced with an inferior store bought cheese. Don't be daunted...this cheese is really simple. Having a quick read thermometer is essential though. This cheese is not technically Ricotta since Ricotta is made from the whey left over from the making of Parmesan cheese...hence its Italian name...re boiled. This cheese is actually a white or bag cheese. It does not melt and if more liquid is pressed out of it, it becomes Paniar and can be used in Indian cooking."

(10) Combine the milk, the cream, 1/2 teaspoon salt and the lemon juice and zest in a stainless steel, enamel or glass pot and place on the stove on low heat...If you are afraid of scorching the milk set the pot in a larger pot and add water to make a large double boiler arrangement.

(11) Slowly heat the milk to 180 degrees stirring rarely. it should be stirred with a wooden spoon no more than than 4 times and then when stirred it should be done slowly and gently so not to break up the curds.

(12) When the milk reaches 180 increase the heat to high and raise the temperature (you can remove the pot with the milk from the double boiler for this) to 208. Remove from the heat and allow it to sit for 10 minutes.

(13) Slowly pour the hot curds and whey into a very fine mesh screen strainer or a double layer cheese cloth and allow it to drain for 15 minutes.

(14) Place the cheese in a container and refrigerate. It will keep for 4 to 5 days.


Lemons and zester


Simmer milk, cream and lemon


Strained ricotta mixed with basil

MAKING THE SPINACH NOODLES

"Right out...if you do not have a pasta machine use either store bought lasagna noodles or if you can find them commercially made spinach lasagna noodles. These noodles are delicate and rolling them by hand would be too difficult if you've never made noodles that way before."

(15) Thaw out the spinach and squeeze out as much water as possible then chop as fine as possible or place it in a food processor and process until fine...but do not puree.

(16) In a large bowl or a Kitchen Aide bowl place 2 cups of flour and the salt. Mix thoroughly and create a well in the middle of the flour. Add the eggs...2 tablespoons of olive oils and the spinach.


(17) If you have a Kitchen Aide using the dough hook and start on low mix the ingredients together until the dough forms. If making by hand begin with a fork and blend together then when the dough is thick enough begin kneading by hand adding flour as needed. Conversely you can also make this in a food processor and process until it is too dense to continue then pour onto a floured surface and finish by hand.

However you make it the final product should be a soft slightly tacky dough. Wrap in plastic film wrap and allow to rest for about an hour.

(18) Bring 1 1/2 gallons of salted water to a boil.

(19) Cut the dough into 5 or 6 portions. and dredge in flour.

(20) Using your pasta machine start on the lowest setting...0 or 1 depending on the machine...roll the dough through it then fold and repeat then fold and repeat until you achieve a rough rectangle. Dredge in flour and set aside. Repeat for each portion. Then turn the dial the next notch up and roll the sheets through once. Then turn the dial up again and repeat.

All told the dough should be run through the machine 3 or 4 times up from 0. if you stop at 3 the noodles will be thicker and more robust...if you go up to 4 the noodles will be thinner and more delicate. Either way you will end up with sheets 3 to 4 feet long.

(21) Cut the noodles into into 13 or 14 inch portions and drop one or two at a time in the boiling water and cook for no more than 2 minutes stirring gently with a wooden spoon.

(22) Pour into a strainer and drop into cold water to stop cooking and drain. Expect to lose several pieces because the noodles are delicate.

Large bowl, flour and eggs


Spinach mixed into pasta dough


Pasta machine with spinach pasta

Cut Lasagna noodles


Pasta being cooked


Pasta draining


ASSEMBLING THE LASAGNA


(23) Preheat the oven to 375.

(24) Thinly slice the basil leaves crosswise into a fine chiffonade and stir into the Ricotta.

(25) Grease a 14 by 8.5 casserole dish and spoon a few ladles of the sauce on the bottom. Then lay 3 or 4 lasagna noodles on top of the sauce...and spoon some more sauce on top of that.

(26) Spoon some of the Ricotta on top of the sauce and noodles...It will have to be plopped on in spots per se since it is too thick to spread and since it doesn't melt it doesn't need egg to hold it together. Then Sprinkle the mozzarella cheese on top of that then layer the noodles on and repeat...all told you should have three layers of noodles, sauce and cheeses.

(27) After you add the last of the cheese on top sprinkle with dried oregano and place in oven and bake for 45 minutes to 1 hour. Remove from oven and allow to rest for about an hour before cutting.


ENJOY!

Ricotta waiting to be layered


Lasagna is ready for the oven


Close-up of lasagna


Fresh out of the oven

Stumble Upon Toolbar

Sunday, March 21, 2010

B-DAZZLED CROCS!

B-DAZZLED CROCS

B-dazled crocs

You would think that after attaching 23,000 beads, bangles and bows to my art car, B-Dazle, I would have thought of something exciting to do with my beloved crocs wouldn’t you?

B-dazle-art car with 23,000 beads

It took Lisa, from Eclectic Visions, to trigger the idea for B-dazzling my crocs. Now, I must tell you, this was no small job. If my shoe size was an adorable size 6, it would have been a lot easier. But, at size 11 (I am just short of 6’ tall so I need a good “understanding.”) it did take me a considerable amount of time.


Another view of b-dazled crocs

I used the same glue I used on B-dazle, which is an aquarium glue and waterproof. I attached simple beads purchased at one of the craft stores. I didn’t want to add anything jangly because I knew it would just get in the way, you know, like swatting flies. I wear the crocs as slippers and to my swimming classes. And, of course, I drive B-dazle down to the Farmer’s Market in Roanoke where I sell my work, so my new crocs will be a perfect match!


B-Dazle and matching crocs


Stumble Upon Toolbar

Friday, March 19, 2010

STONEWARE CLAY PLANTER-COOSAPONAKEESA

"COOSAPONAKEESA"

Stoneware Clay Planter titled Coosaponakeesa

SOLD - Thank you Inga

Often times I name my stoneware clay planters after legendary women from many different cultures. So is the case with the planter I finished this afternoon. My friend, Gene Barfield, renowned photographer of the Roanoke Farmer’s Market, told me the story of his many times great grandmother, Coosaponakeesa.

Her name was Princess Coosaponakeesa (“flying white horse”). She was the niece of emperor/warrior Brim of the Creek nation. It was that relationship that gave her the title, “princess.” Born in the 1700's, she was married 5 times. One of her husbands was John Musgrove, and she took the English name Mary Musgrove. She was a Yamacraw Indian of the Musogean tribe and the Wind clan, and she learned to speak English as well as Creek. She was the only Yamacraw Indian who spoke English at that time.

When military leader James Edward Oglethorpe landed in Savanna, Georgia in 1733, he selected her as the cultural liaison between Colonial Georgia and the Creek nation. For her services as an interpreter, she was given the islands of Sapelo, Ossabow, and St. Catherines near Savanna, Georgia in 1760. Later, the English took the land away from her and she became very upset. She was thrown in jail at Ft. Fredrica where she caused a lot of trouble. Eventually, she was reimbursed for the loss of her land with 2000 pounds sterling from the auction sale of Ossabow and Sapelo. She lived into her late 80's, an age that very few reached at that time.

Close-up of embellishments

Gene told me that James Oglethorpe visited Coosaponakeesa a lot after she finally settled in South Carolina’s Cowpens. He also gave her one of his rings before his final return to England. She, in turn, named two of her sons James and Edward. Hmmmmm … . Because of this, many people over the years have speculated that Oglethorpe wasn’t the “straight arrow” he was once thought to be.

I created Coosaponakeesa by using stoneware clay fired to a high temperature to withstand any type of weather. She can be placed outside all summer and will even endure winter but I recommend bringing her inside. I used as her embellishments items I have found from various places. The copper headplate looks very old and shows a Mayan figure with symbols. I used a copper, silver and bronze colored piece for the center. I love the combination of those three metals together. A spiral pendant completes her look. She is for sale and I have priced her at $78. If anyone is interested please just e-mail me at cherdolby@cox.net to make arrangements. I do not plan to put her on the Etsy shop because I take all my planters to our Farmer’s Market here in Roanoke to sell. Hope you like her.

Side view

Stumble Upon Toolbar

Wednesday, March 17, 2010

THE HERBALIST STONEWARE CLAY PLANTER

THE HERBALIST

First planter of the season completed

HAPPY ST. PATRICK’S DAY EVERYONE!

My green offering for today is my planter titled “The Herbalist.” She looks very similar to the one on my banner but she is an entirely different planter. The planters vary. Sometimes I add eleborate embellishments to them and other times, I place clay leaves around the face. Every winter I work on sculpting as many as I possibly can in order to get ready for spring and summer sales at the Farmers Market, here in Roanoke.

I’ve done several posts on my stoneware clay planters. I love it when I open my kiln and see that they have fired properly with no cracks, or explosions. Drying clay is difficult in the winter. No matter how long the planters sit in the studio drying, if moisture seeps back into them before they reach the kiln, anything goes. I usually dry them for several weeks and then set my heater on low and run it overnight in the studio. I place them in the kiln with the lid open for several hours on low just to warm them thoroughly and then I run it as usual for the next 10-12 hours. Since my customers often times keep the planters outside, I have to make sure they are fired properly.

I always name my pieces or give them a story. My first planter of the year is often called “The Herbalist.” This seems appropriate to me since I do love herbs.


THE HERBALIST

She is a teacher, healer, wise woman and keeper of the old traditions. Each day, with great reverence, she gathers the herbs for the needs of her many friends. Basil for love and good wishes, sage for wisdom and long life, rosemary for remembrance, lavender for devotion.

Her garden is a special place. A place where birds and butterflys abound and where laughter and solitude each have their place and where, some say, the secret to the universe can be found…


~Cheryl Dolby~

Stumble Upon Toolbar

Saturday, March 13, 2010

SMALL IS THE HEART PHILOSOPHY ART DOLL

SMALL IS THE HEART THAT CAN LOVE BUT ONE
PHILOSOPHY ART DOLL

Small is the Heart...Philosophy Art Doll

This may be my favorite paper art doll so far. I was going to hold off until I purchased my new camera before I took a picture of her but couldn’t wait to show you. My old camera is simply falling apart. It is a Nikon Coolpix. I looked online and read a lot of reviews only to find that each camera seems to have a drawback. What I don’t like about the Nikon is that all of my sculptures have a squatty appearance. The paper art dolls look as though they have extremely short legs, which is not the case at all. But, the paper dolls squattiness have nothing on my tall “daughters of antiquity” series. They are tall and serene and yet look completely out of proportion. I’ve had to use a lot of editing to make them appear close to their normal size and I look forward to just getting an accurate picture in the future!

Close-up of doll

I used a beautiful batik material I found the other day along with one of my original hand sculpted faces and an embossed tattoo for this one. The saying, "Small is the heart that can love but one," is one that a customer of mine gave me one day. She said it is selfish to only have one love in your life. Our hearts are vast and have the capacity and the need to share love with many.

Silhouette of doll

Stumble Upon Toolbar

Thursday, March 11, 2010

Timekeeper

TIMEKEEPER Fres-Go Box


Timekeeper box

I found the box I used for my Timekeeper fres-go tile at our local flea market, called, Happy’s. I get happy just thinking about that place. Usually I can find almost anything I need to complete one of my many art projects.

The box was filled with an antique set of alphabet stamps from a printing shop. The stamps were in perfect condition so I decided to leave them intact.

This box is such a great way to store stamps for artwork. I placed ball feet on it and gave it a light coat of acrylic paint. I left all the inside lettering just as it was. I used tiles in a mosaic fashion for the top along with the fres-go tile. To read more about those tiles I create just go to my posting of Oceana.


Antique alphabet box

I write stories for all of my artwork and include them in my book She Who Whispers. This is the story I have given to her:


"Timekeeper”

There were three doors in her life. The
Doors of yesterday, today and tomorrow.
Yesterday appeared to be only an illusion,
Tomorrow a vision. Both were vague and
Nebulas. Today was a place she could not
bear to be. The choice was at hand. The
Voice of intuition began to speak to her and
Somehow she knew in her heart that all time
Is simultaneous..the first cry also being the
Last..for there is only now. By dealing with life
In the present, she could begin to remove
some of the scars of the past and thus change
Her future...with a renewed sense of the
Importance of now..and a recharged inner
Essence..she entered the door of today..where
A new world awaited her.


~Cheryl Dolby~

Stumble Upon Toolbar

Tuesday, March 9, 2010

WITHIN THE WITHIN

WITHIN THE WITHIN


Within the Within, Paper Art Doll

Several years back, I was on a spirit quest which took me to the Hopi Indian tribe in Pollaca, Arizona. I studied with Bonnie Nampeyo and wrote a story about her. Later, I also undertook a correspondence course with Yowanode Two Wolves, Twyla Nitsch. Grandmother Twylah was the clan mother of the Wolf Clan Teaching Lodge of the Seneca Indians. She gave me the title “Keeper of the Stones” and sent me a small pouch with a sacred stone inside.

Click on story to enlarge

I loved my studies with her and was moved to write a story about her as well. Both of these stories can be found in my book, She Who Whispers. When I wrote the story titled Within the Within, I sent it to Twylah for her approval. She read it and told me that she approved of all but one word. The last word in my story ended with the word “power.” Twylah explained to me that if I changed that name to “withinness” more “power’ would be invoked into my story because it was the withiness that takes us to our center and our truth.

Silhouette of Within the Within

Sadly, Twylah passed away two years ago. The Senecas like to say that she went on her Skywalk. She left a legacy behind. She tried to teach Americans the beliefs of her tribe and she warned of the changes of our Mother Earth.

I’d like to dedicate my Philosophy Paper Art Doll, Within the Within to Twylah. I created Within the Within by using fiber, coir, yarn and if you look closely, there is a small turtle shell just under her neck. This shell was given to me by a woman who raises turtles. She said the scale was taken from the back. I also have included a very tiny lotus pod that my friend Scott gave me from one of his many water ponds. It is only about a half inch wide.

Close-up of turtle shell

Stumble Upon Toolbar

Sunday, March 7, 2010

SPELLBOUND AND SPEECHLESS

SPELLBOUND AND SPEECHLESS

Look what has arrived!

Gifts from One World, One Heart lined up on my Fantasy Art Chair

It is hard for me to believe that I was fortunate enough to win not one or two, but three amazing gifts from the One World One Heart contest set up by Lisa Swifka.

As these gifts started arriving, I felt like each and every one of them was created just for me.

The first package to arrive was from Terri Kahrs of Pringle Hill Studio.

Array of Terri's colorful artwork

Terri has a degree in interior design and paints murals for children’s walls. She loves collage and art journeling and recently has started doing zentangles. I was lucky enough to receive a set of her vivid, colorful postcards, a fabric print, a signed print of her work and three remarkable collage pages. I knew immediately after looking at the green, orange and purple pages I wanted to use them in my angel paper doll series. So, with permission from Terri, her work merged into mine and became “Philosophy Angels.”

Terri's paper used for legs and arms of Philosophy Dolls

Now, as if I weren’t excited enough, the next package arrived shortly after and out popped Deirdra Doan’s adorable Sea Doll. Not only does Deirdra create dolls from her home in Oregon but she helps her husband John, a Celtic musician, get bookings all over the world. They will be headed to Europe soon. You can feel the love coming from Deirdra as you view her dolls. Her work will also be featured in 3 magazines this spring. Somerset Studio, Art Doll Quarterly and Belle Amoire.

Sea Doll seems very comfortable in her new home

I placed Sea Doll on the fantasy chair where I keep other dolls..she looked very much at home there. Every time I walked by, I felt like I had to pick her up and carry her around for awhile since she is so textural and adorable. Unfortunately, I have a dilemma. I may have told Dierdra a lie. Not intentional, mind you. I had made a comment on her post when I asked to be counted in the draw, that I had a special little girl in mind for the doll. Well, I DID, have this special little girl in mind.

Makayla

But….I am not able to part with sea doll. So, Makayla and I came to a compromise. Sea doll will live with me but when she comes over to visit, the doll is all Makayla's while here at my home, Woodloft.

Now, last but not least. Michelle’s gift arrived from Australia. Look at this precious little Ice Fairy!

"Ice Fairy

Michelle sculpts small fairies and mermaids from polymer clay and has a strong love for the environment. The features on her dolls are delicate and fragile looking but the doll itself is very sturdy and well constructed. I love the see through wings and icy grey hair. Perfect for an ice fairy.


When I opened the package and saw the fanciful little flower box I just stood there in anticipation. Then I found the beautiful card with Michelle's sweet message inside. I opened the box and saw the tiny speckles of stardust and slowly lifted it to find the most beautiful little fairy I have ever seen! To say I love her is an understatement.

As I was putting the postal box that the Ice fairy arrived in away, I noticed some artwork and stickers on the side. Michelle’s children had decided to add their artwork to the gift. Thankyou and big hugs to them!

I feel extremely priviledged to own work from all three of these talented women. I cherish the gifts I have received. All will have an honorable place in my home.

Thankyou, thankyou, thankyou! It was my birthday during the time of the contest and I must say these were precious gifts to me.

Stumble Upon Toolbar