Thursday, September 30, 2010

Earth Walker Native American Sculpture


“EARTH WALKER”


“KEEPER OF THE STONES"

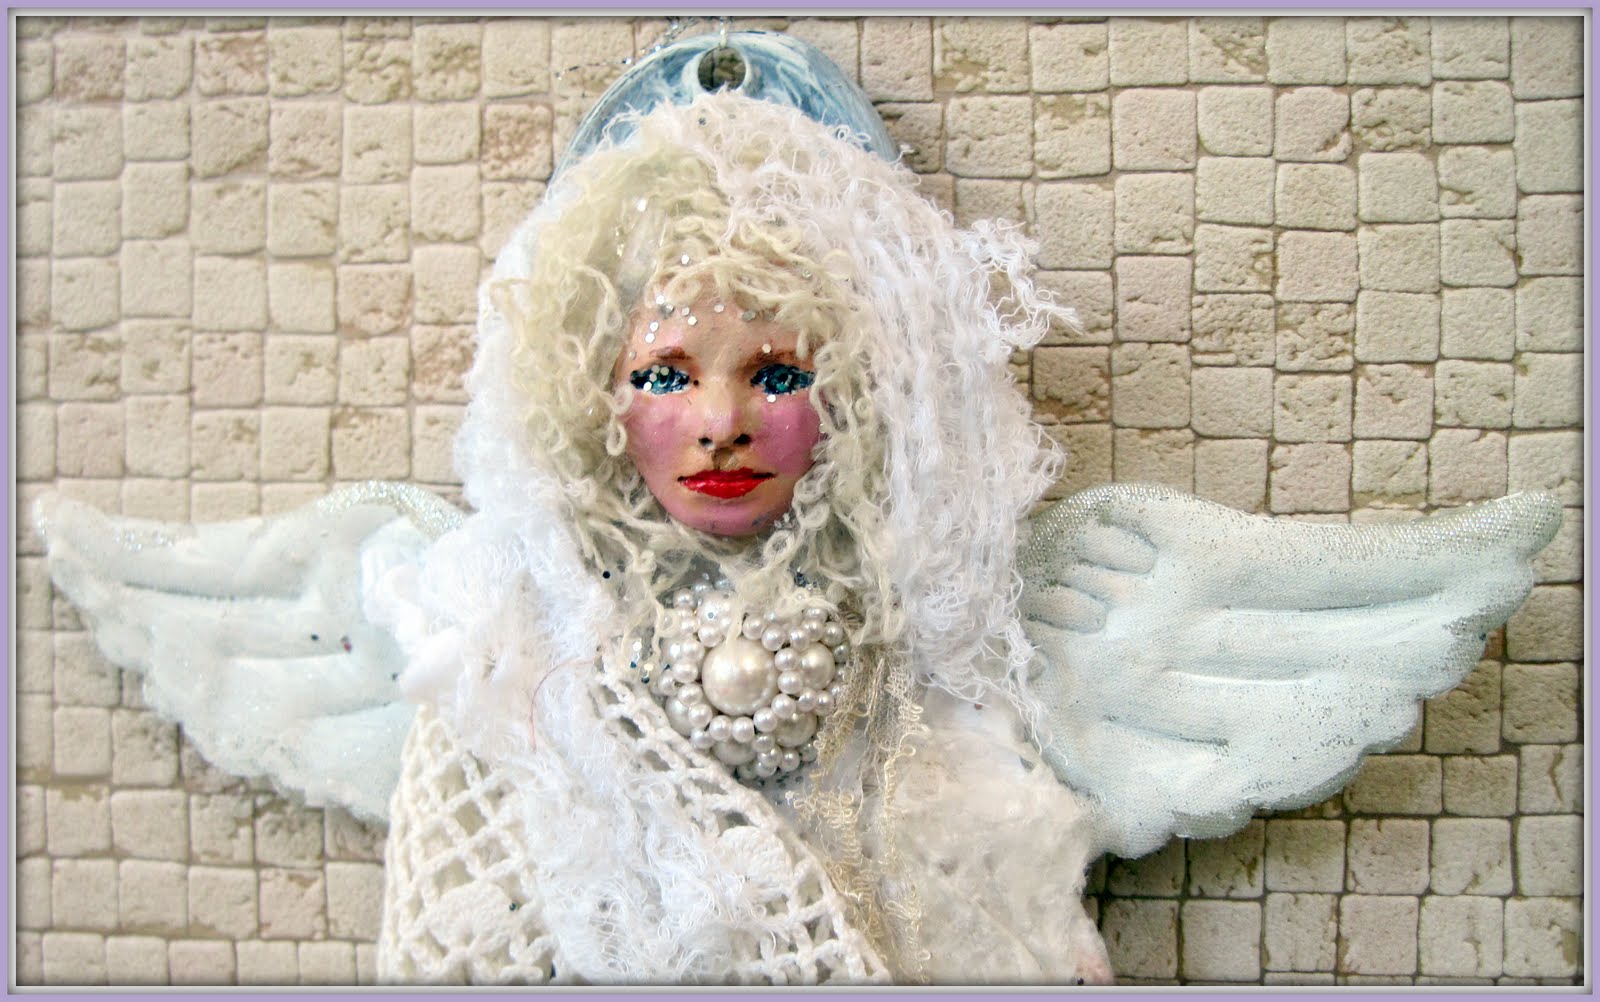
Earth Walker, Native American Sculpture

Years ago, I studied with Yowonode Two Wolves, (Twyla Nitch) clan mother of the Seneca Wolf Clan. I received the status of “Keeper of the Stones” which meant I was entrusted with special stones denoting power. Being greatly inspired by the Senaca philosophy I wrote the story I attached to my sculpture.

Earth Walker is the third in my series of the smaller Daughters of Antiquity sculptures. I used stoneware clay and ancient looking embellishments and material. She is approximately 17”h x 5”x w x 4: deep. Even though my new series is not as stately as the taller version, they definitely ship at a much more reasonable cost.

Earth Walker

She arrived from infinite space of her own choice.

She brought with her only faint memories of lives lived before. In her memories of all those lives, one over-all theme seemed to prevail..the ribbon of harmony in all things.

More memories stirred and she saw herself in a distant time, placing her ear to the ground and hearing the great mother whisper to her. “Listen,” she said, “to the pulse of all life.”

All nature was speaking to her and she was prepared to listen to the language of the stones, for even the stones have voices. The outer hard surface of a stone is merely the covering and the spirit lives within..just as our bodies are only temporary houses for our souls.

She listened to the garden and with relaxed vision, she saw and heard the nature spirits respond to the commands of the Devas..and each fruit and vegetable fulfilled their promise. She listened to the stream trickle past and on to a greater end.

She was at peace and entered into the silence. Being aware of the spiritual light, she became connected to the spiritual essence and knew that all is in flow..all nature is alive..THERE IS NO DEATH..only change.

~Cheryl Dolby~

Full view

Close up view

Side view

I have treasured the stones Grandmother Twyla gave to me and as I hold them, I wonder about the spirit in all things. I do believe that stones are alive in some way. Perhaps their language is that of silent observation.

You can read more about her at my Etsy shop by clicking here.

Other side view

Stumble Upon Toolbar

Friday, September 24, 2010

GODDESS MAGIC CREAMS INSPIRED BY PRACTICAL MAGIC

GODDESS MAGIC CREAMS INSPIRED BY PRACTICAL MAGIC

Goddess Magic Creams

Justina and Anna from Mistic-Majik have come up with a grand idea for anyone interested in showing their arts, crafts, decorating skills or other talents related to the movie or book called Practical Magic.

Before starting my post, I looked up the word magic. One synonym of magic is “enchantment.” I immediately thought about my Goddess Magic Creams. My customers seem to be enchanted by them so I thought perhaps my readers would like a tutorial or at least a method on how to create them.


Goddess Magic Cream with original clay face and turquoise

In a previous blog post I jokingly said I feel like Madam Curie whenever I start to concoct my Goddess Magic Creams. Sometimes I also feel like a witch as I siphon out, mix, grind, measure and jar them. As a sculptor, I never expected to be creating face and body creams but when I found some beautiful glass jars with lids, the inventive side of me kicked in.

Refill jar

I sculpted faces out of stoneware clay and added interesting embellishments to each jar. I experimented with various butters and oils and It took me over two years of research and development to finally decide my creams were worth selling.

Ingredients

I finally settled on almond oil, shea butter, bees wax, glycerin, silk protein, grapefruit seed extract, panthenol, essential lavender oil, emu oil and coconut oil. and water AND..a "Magical" ingredient.

More ingredients

I heat the oils and butters until they are completely dissolved. I also heat the water. Next step is to whirl the mixture in a food processor set aside strictly for the creams. I first add the liquid ingredients and water, then slowly drizzle in the heated oils and butters.


Oils being heated

I place the cream in a freezer for about an hour. I then re-whip it in the processor until it becomes creamy and fluffy. This is probably the hardest part because everything I’ve done prior to this step depends on what the texture will be like. I was disappointed by a bad batch when I first started making the cream but seem to have perfected it now. The cream batches are now consistent.

Cream after being whipped

The one ingredient I am missing right now, and here is where the magic comes into play, is the Holy Water that I collected from the Sacred Grotto of St. Bernadette from Lourdes, France. I brought the water back over three years ago and decided to add small portions of it to my cream. I was surprised that the water lasted so long! Every time I got to the point where I had only a dribble of water left, one of my family members or friends would bring me one of the souvenirs of the water I had given to them asking if I’d like to have it back for my cream.

One of the bottles of Holy Water from Lourdes

Refill jars

My customers have told me some pretty amazing stories concerning my cream. Some say it gets rid of hives, other tell me that aches in their hands disappear when they use it. While not trying to sound like a snake oil doctor, I will just say that there is a good chance the creams are…..magic…

Hematite lid with original clay face

I will be concocting more of my Goddess magic Cream this winter with hopes that someone will appear with a bottle of the water from Lourdes, since I’m now completely out. Perhaps you’d like to judge for yourself if they are indeed... magic.

Amythyst lid with original clay face


Each jar comes with a scroll with ingredients and magical properties listed

If you would like to read more of the Practical Magic inspired blog posts, please just click on the button at the top of my blog on the right hand side called "Practical Magic Blog Party"

Stumble Upon Toolbar

Sunday, September 19, 2010

FRESGO'S

FRES-GO'S

Fres-go Box, close-up

I haven’t made a mistake in the title of this posting. Fres-go's is the actual name I have given to a technique I created several years back.

Since most of us do not live at one place long enough to watch a fresco age, or even own a fresco, I decided to create smaller frescoes that can be transported to any new surrounding. I have used the techniques of painters such as Botticelli, Giotto and Masaccio. Like the masters, I painted into the plaster and limestone while it was wet. This is a difficult process since I am forced to work a lot faster than I would otherwise. I sometimes add embellishments to each fresco and finish with a light varnish to help preserve them for the oncoming centuries, and, since they will be "to-go" I have named them..."Fres-go's."


Fres-go box, full view

My goal was to construct fresco pieces but I did not want to go to all the trouble of grinding limestone and sand. Later, I decided that I DID want to go to the trouble and I DID want to create fresco in the true Italian style.

After much searching for a fresco teacher, I found the acclaimed Alma Ortolan. She restores fresco’s in churches and facades on building fronts and lives in an adorable village in northern Italy in the Vittoria Venuto region. You feel as though you stepped into a fairytale when you enter Serravalle. I’ve never seen an entire village made of stone before and was delighted to have the opportunity to live there in Alma’s pallazzo for over 2 weeks.

In an earlier post, I show pictures of the village and Alma. You can see Serravalle and read more about it by clicking here

Serravalle

After I got back, I decided to create a fresco using the method I learned from Alma. I wanted my piece to entail all techniques used by the masters of old. I decided to do everything exactly like they did.

The masters of old used large walls in cathedrals as a backdrop for frescoes such as Michangelo's Sistine chapel. A fresco is actually a painting that has not been painted on a wall but rather into a wall. This painting is finished while the plaster is still wet. Therefore; the painting and the wall are one!

When a fresco is painted into a wall, it takes on all the changes that occur in that particular atmosphere and building. That is what makes them so unique and special. The cracks and crevices that occur within the fresco are a result of many years and changes beneath and around it, just as our own exterior is a living testimony of what has occurred during the course of our lives. I have said that I am actually proud of each wrinkle on my face..they are a result of what I have given and endured. I have earned them.

By using this method, I created a Buon Fresco. Buon means true and Fresco means fresh. In other words, I had to paint into the sand and limestone while it was still wet. The opposite of Buon Fresco is Secco Fresco. The term Secco, means that you paint onto the sand and limestone once it has dried.

Getting the material together took some doing. It was like a scavenger hunt! I had to order limestone that had been aged for 6 years from Italy. I gathered sand from the river, I used pigments I bought while in Italy, I made a grinding tool out of a glass beaker I had and used a glass mixing tray.

Here I am applying the limestone and sand over base

After a very labor intensive 8 months, I finally finished my Buon Fresco of 3 angels. I named it, Angels of wisdom, love and strength. It is 6’tall x 4’w. Normally frescoes are created on and in a wall but I wanted mine to be mobile, just in case I ever needed to take it with me at some point so I had to go to great lengths to build a support for it.


Finished Fresco

I now have reverted back to making fres-gos. I find the Buon Frescos are too hard to transport and not cost effective at all. It takes a tremendous time to finish them. I am so glad that I learned how to create them the proper way though. I have heard it said over and over, “You have to know the rules, before you can break them.” Break them I do for sure and in this case I broke the rules before I knew them.

Below is a simple tutorial on how I created my box using the fres-go method.

l. The first thing to do is find a simple tile.I found the one shown below at Lowe’s.

2. Next, use a trowel and paint joint compound over the surface using a sleek even stroke. Let tile partially dry for Buon or completely dry for Secco.

The picture below shows the plain tile and the one I painted with joint compound.

Unfinished tile on left and one which I applied joint compound to on the right

3. Draw a sketch and then trace the picture of the item you want to place “into” the tile or draw your image directly onto the tile without the use of tracing paper. I mostly always create women’s faces.

Tile with joint compound, tracing paper and original image drawn on paper

4. Once the image is drawn into the partially wet surface start to paint it with acrylic paints for Buon fresco. For Secco fresco, wait until the tile has dried completely.

5. You can paint as long as the tile remains wet for Buon. The Italians call this time Santo D’Oro or the hour of the Saint. The reason is that the mortar stays wet for only about one hour. You can also work on it after it dries for Secco.

6. Once the tile has completely dried, apply matt Golden Gel Medium or Modge Podge thinly over the top to seal. Or, alternatively, if you want a very slick looking tile, you can use gloss Modge podge.

Finished tile, ready to be used in artwork. Notice the imperfections in the surface

Now you are free to use your tile in any manner you wish. The sky is the limit.

Inside of finished box

For anyone interested in Alma’s class in Buon fresco, you can check it out by clicking here

To purchase or see other views of my fres-go box, click my Etsy shop here.

Last but not least and back by popular demand (LOL) Here are 4 more of my Angels of Antiquity. You can click on each number, which will take you to my Etsy shop.


Angel number 1


Stumble Upon Toolbar

Monday, September 13, 2010

''ANGELS"

“ANGELS”

"Angel of Antiquity" Number 1
Sold.
Thank you Deb!

The other day, my daughter, Kirsten, said something that struck a cord with me. We were discussing our sometimes (and many times) dysfunctional family. She told me that it helps her a great deal to go above and look down because things become clearer from a higher vantage point. Ok. I was surprised that she said this because she is not a metaphysical thinker as I can be at times. She views life in a rather skeptical, straightforward fashion and doesn’t delve into any new age thoughts. I contemplated what she said. I thought about a force much larger than I am, about an entity who is beyond time. I imagined what life on this plane must look like to a greater being. When you view a parade, you stand in one place and you watch as the clowns go by, the baton twirlers, the band and the floats. You see only each particular event going by at a time. But, if you were to go to the top of a skyscraper and view the parade from the top floor, what would you see? You’d see the entire parade in front of you, ALL AT ONCE.. You’d see each actor and player doing their thing to construct the “whole” of the parade. Maybe it is that way with families and the world for that matter. Seen from above, you can complete the picture of the whole in a much better light, or a different light.

Close-up of angel number 1

One time, not so long ago, I was extremely distraught about a family situation. I took to my bed (all the women in my family have done this for decades, if not centuries.) I climbed into my bed and pulled my large heavy feather tick (that’s a comforter) over me. It was snowing outside and I knew I’d be completely snowed in by morning. The mountains and the dark closed in and I knew I was in for a long sorrowful sleep. I closed my eyes, feeling a deep sorrow in my heart. I tried desperately to sleep. Before long, I sensed a great quiet envelop my room. As I finally relaxed into the deep calm I began to feel that there was something or someone in my room. It was as though a warm, delicious weight of love was surrounding me on my bed, nurturing me, coaxing me to forget everything for awhile. I felt a weight over me. I felt something that can only be described as…wings…comforting me. It is true that it could very well be that I simply “had a dream.” I’m not really sure, I only know that when I awoke, I felt compelled to write this story:

Angel of Sacrifice

Silently,

I lie cocooned beneath the gossamer wings of my guardian angel

I do not move, for fear she will leave me here
Alone

To face the universe of memories
That abides in my mind.

Unrequested

She came with strength, wisdom and love
And a promise to lift my sorrow.

Luminescent prisms flow in the distance
Becoming brighter and clearer as I
Travel

Seeds of light burst round me in an
Unwavering fashion. My angel by my
Side, we transcend toward
A presence brilliant and familiar.

I am teased with leaving behind the
Heaviness of my life and escaping to
this place of
Peace.

But…
Knowing in my heart
That it is not the time..for thre is
Much more love to give before I
Can go home again….

I return.

~Cheryl Dolby~


Sold. Thank you Baukje!

Since that time, and it was about 5 years ago, I have created angels of all sorts. Sometimes they appear with halos or wings. Even though I write many stories for the work I do, I never have written another angel story. Angel of Sacrifice always applies to my angels, even though each one is different.

Angel Number 3

I have named my new series, Angels of Antiquity. They are each an original with a hand sculpted clay face and wings that I created by applying encaustic wax. I found old door plates to use as hangers and I use antique lace and jewels in each one. I have priced them very reasonably at $46. They come from my heart and can be found in my etsy store by clicking each number.


Angels? Who knows? All I can say is that something magical happened to me one night.

Stumble Upon Toolbar

Tuesday, September 7, 2010

CELTIC ANGEL WITH IRISH BODHRAN DRUM

CELTIC ANGEL WITH IRISH BODHRAN DRUM

"Megan"

I love drums of all kinds but I honestly had never heard of a Bodhran before I got to Ireland this summer. It is pronounced Bow-rawn. I noticed it being played at the Irish folk show we attended as well as at the castle and pubs. It is not played like a regular drum but rather it looks like the musician is using his drum stick, which is called a cipin, like a paint brush and “painting” the drum.

There is a lot of speculation as to the origins of the Bodhran. It is believed to have originally come from Africa, via Spain and then to Ireland. Wikipedia says it means “skin tray” and suggests the Irish used it to carry peat. Wherever it did originate, I can tell you that it definitely is the heartbeat of Irish music.

Bodrhan drum I brought back from Ireland

After being asked by a musician to play the drum (just for fun) at a pub one afternoon, I was hooked. I had to have one. I did purchase one in Ireland and believe me there is a long story about how I finally got the huge drum home. I’ll leave that to your imagination. I have a drumming ceremony once a year here at Woodloft, my home. I’ve been remiss in scheduling one for this summer because I was so busy with the UK trip but I am planning on having one around Halloween. Of course, I will have to learn how to play it by then and it doesn’t look easy. Maybe this will give me an excuse to visit our local Irish pub here in Roanoke, called Flannigans. I understand people with Bodhrans drop in and are happy to teach.

If you’d like to hear what they sound like, I found this very cute video of 2 fellows playing their bodhrans. They are typically Irish~


In the meantime, I decided to paint an Irish maiden with a Bodhran. She is a Celtic Angel and I have named her Megan, after my tour guide for the Grand Britain tour that my granddaughter, Marcy, and I took this summer. Megan truly was an angel to us. She is a high spirited woman who gives from her heart and soul. She danced, sang and absolutely threw herself into making our trip one we would remember forever.

There are all kinds of ways to travel abroad and I like every one of them. You can travel for adventure and live in a rugged setting in, let’s say, Africa. You can take a class in something useful, like a cooking class or in my case sculpture classes. You can drive a private motor car and travel at leisure, which has it’s place as well or you can take one of the escorted tours like I do with my grandchildren. The life of a tour director on one of these tours is a very difficult one.

Megan was up at the crack of dawn planning our day, making calls to be sure all was in order. She didn’t retire until very late at night, making sure we were all safe and sound in the many hotels in which we stayed for the 21 day excursion. She made sure all day tours were lined up, all rooms were appropriate, seating arrangements at dinner were proper and the list goes on. When our trip was over, she had to leave for her next journey-another long 22 day tour. Stamina must be her middle name. She made us laugh constantly and she wasn’t afraid to tell on herself. I asked her if she ever forgot anyone at the many stops that are made during these trips. She told me the only person she ever forgot was ….her mother! She said she had a hard time living that one down. She also told of the time she got out of the coach and climbed over the rock wall to show her group one of the bogs. She sunk waist deep, which actually was a great demonstration.

Close-up of halo

View from the bottom of painting

Close-up of texture

Megan made the remark while on the tour, “In another fairy tale life, I will one day have thick hair like Cheryl’s” So, I decided to be sure to give my Megan Celtic Angel a full head of hair. I’m sure Megan would never have guessed that her story would one day be posted on my blog, depicting her with thick hair and a halo. Maybe this is the fairytale she spoke of.

You can find my Celtic Angel for sale in my etsy shop by clicking here

I painted her with acrylic and used a technique I learned in Italy for the halo. I used Magic Texture Paste for the background celtic imprints.

Last but not least. Here is the real Megan. Can you see the halo over her head? I can.

Ted our driver, and Megan

Stumble Upon Toolbar