Showing posts with label tutorial. Show all posts

Wednesday, July 18, 2012

HOW I MAKE MY OWN CANCER TEA AND OTHER EXOTIC TEAS

HOW I MAKE MY OWN CANCER TEA
AND OTHER EXOTIC TEAS

Pineapple Mint and Chocolate Mint-Freshly Harvested

I love making my own teas because it gives me the versatility of creating exotic herbal blends, not found anywhere else. I’ve even gone so far as to create my own teas for particular ailments or diseases. I bought a book years ago that has been my guideline for creating teas to help with cancer, intestinal tract problems, nervous system difficulties and a variety of other health problems. The book is called “Healing Teas from around the world” by Syliva Schneider.

Of course, I use the book only as a guideline. I prefer to study effects of different teas and create my own elixir.

When my daughter, Kelli, found out she had multiple myeloma cancer 8 years ago, and after the initial shock, we decided to follow conventional therapy as well as look into alternative methods. Kelli is thriving today and I believe that the teas could have played a roll in her recovery.

You may want to check out an earlier post on how I prepare my herbs. The post is titled “Now is the Thyme” found here

Dried Herbs After Removed From Brown Bags

Basically, I dry my herbs in brown sandwich bags, place them in my car and wait a few days to remove. They dry quickly and impart a wonderful aroma at the same time.

Tea Being Placed Into Small Tea Bags

After the herbs have dried, I scrunch up the brown bags until the leaves are thoroughly pulverized. I remove larger stems and then add them to purchased tea bags that can be found online or specialty herb shops.

I used spearmint, pineapple mint and peppermint tea leaves for my pictures for the post.

The tea bags are then ironed closed and are ready for brewing.
I then place tea bags into zip lock bags with my logo and list ingredients.

The bags Are Sealed Closed by Ironing Them.

Below is a bit about the ingredients and the recipes I used for Kelli’s cancer teas.

Lapacho tea is made by using the bark found on the lapacho tree found in South America. It is reputed to have great results when used for asthma, stomach complaints and cancer and impede the growth of tumors.

Eassiac Tea or Original Indian Essence. This tea was reportedly used by the Indians in southeast Canada and many claims are made touting it as a cure for cancer. The ingredients are, roots of burdock and Turkish rhubarb, sheep sorrel and slippery elm bark. These are herbs that help strengthen the immune system.

Bark and Root Cancer Tea:

1. 1 t. each of the burdock, Turkish Rhubard, sheep sorrel and slippery elm bark or you could buy a box of Eassiac tea with these ingredients sometimes found in health food stores.
2. 2 t. crushed lapacho bark

Mix together and add to tea bag. I use several of these bags in a pot of hot water-let them steep for about 10 minutes or so. Tea is a bit bitter so honey can be added to your cup if preferred. Alternately, if you want a stronger tea, let herbs steep for about an hour and reheat the tea before drinking.

In a later post, if there is interest from my readers, I’ll give more information on methods we used to help Kelli keep cancer at bay. She is and has been in guarded remission for several years now but we, and I say we because I am her coach, continue a strict regimen to insure her continued remission and phenomenally good health. Her oncologist has told us that he thinks Kelli is a miracle case.

Mint Tea All Ready for the Market~

Stumble Upon Toolbar

Wednesday, January 4, 2012

WHEN THE CREATIVE SPIRIT HITS

WHEN THE CREATIVE SPIRIT HITS

Journal Page Number 1

Remember the old journals that they used to sell years ago-long before memory making journals were even thought of? Well, I made a new years resolution that after seeing so many creative journals in blogland, that I wanted to finally start my own.

Journal Page Number 2

Unfortunately, it was the New Year’s holiday and no stores were open for me to go out and purchase a spiffy journal album. Actually, I really didn’t want to buy one anyway in case I messed up. Since the creative spirit or muse hit, I knew I had to improvise. I dug through my old pictures that I keep meaning to get sorted and found several ugly old journals that must be 40 years old! They are one of a kind now since I don’t think anyone is making these outdated beauties anymore.

Old Album I found In My Studio

Here are 2 that I have finished. Oh how I wish I had good penmanship! I’ve tried writing and printing on some of my artwork before and it is unreadable! I have even taken courses in calligraphy to no avail. I was thinking of trying to write in Italian or French which would be fun but I can’t do that either. I’m taking an Italian course right now so maybe next year but for now, my scribbles will have to do.

Close-up

My method for these two pages was this. On page number 1, I used a digital print of one of my original paintings and painted the background with acrylic so that it can be written on. Then, I cut out pictures from magazines and attached along with a very ancient looking key I had in studio. I painted over her hair with purple acrylic and then added a coat of sparkle translucent paint over the background making sure I didn't completely hide the musical notes and finally added Dorland's wax medium for a refined look and for protection. I love this wax.

For page number 2, I used magazine images and rubbed Never-Dull Wadding Polish to meld the images to my liking. Then I applied crackle glaze to the face and finished it off with more of the Dorland's wax.

Another Close-Up of Crackle Technique

I haven’t written on either of the pages yet (still procrastinating) so if anyone would like to make a copy of them to use in your own journaling, please feel free.

Stumble Upon Toolbar

Friday, September 24, 2010

GODDESS MAGIC CREAMS INSPIRED BY PRACTICAL MAGIC

GODDESS MAGIC CREAMS INSPIRED BY PRACTICAL MAGIC

Goddess Magic Creams

Justina and Anna from Mistic-Majik have come up with a grand idea for anyone interested in showing their arts, crafts, decorating skills or other talents related to the movie or book called Practical Magic.

Before starting my post, I looked up the word magic. One synonym of magic is “enchantment.” I immediately thought about my Goddess Magic Creams. My customers seem to be enchanted by them so I thought perhaps my readers would like a tutorial or at least a method on how to create them.


Goddess Magic Cream with original clay face and turquoise

In a previous blog post I jokingly said I feel like Madam Curie whenever I start to concoct my Goddess Magic Creams. Sometimes I also feel like a witch as I siphon out, mix, grind, measure and jar them. As a sculptor, I never expected to be creating face and body creams but when I found some beautiful glass jars with lids, the inventive side of me kicked in.

Refill jar

I sculpted faces out of stoneware clay and added interesting embellishments to each jar. I experimented with various butters and oils and It took me over two years of research and development to finally decide my creams were worth selling.

Ingredients

I finally settled on almond oil, shea butter, bees wax, glycerin, silk protein, grapefruit seed extract, panthenol, essential lavender oil, emu oil and coconut oil. and water AND..a "Magical" ingredient.

More ingredients

I heat the oils and butters until they are completely dissolved. I also heat the water. Next step is to whirl the mixture in a food processor set aside strictly for the creams. I first add the liquid ingredients and water, then slowly drizzle in the heated oils and butters.


Oils being heated

I place the cream in a freezer for about an hour. I then re-whip it in the processor until it becomes creamy and fluffy. This is probably the hardest part because everything I’ve done prior to this step depends on what the texture will be like. I was disappointed by a bad batch when I first started making the cream but seem to have perfected it now. The cream batches are now consistent.

Cream after being whipped

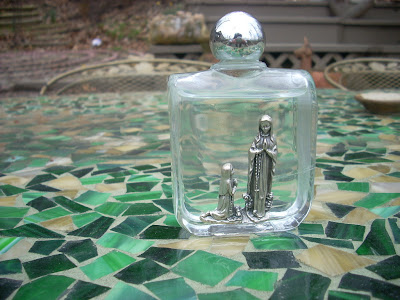
The one ingredient I am missing right now, and here is where the magic comes into play, is the Holy Water that I collected from the Sacred Grotto of St. Bernadette from Lourdes, France. I brought the water back over three years ago and decided to add small portions of it to my cream. I was surprised that the water lasted so long! Every time I got to the point where I had only a dribble of water left, one of my family members or friends would bring me one of the souvenirs of the water I had given to them asking if I’d like to have it back for my cream.

One of the bottles of Holy Water from Lourdes

Refill jars

My customers have told me some pretty amazing stories concerning my cream. Some say it gets rid of hives, other tell me that aches in their hands disappear when they use it. While not trying to sound like a snake oil doctor, I will just say that there is a good chance the creams are…..magic…

Hematite lid with original clay face

I will be concocting more of my Goddess magic Cream this winter with hopes that someone will appear with a bottle of the water from Lourdes, since I’m now completely out. Perhaps you’d like to judge for yourself if they are indeed... magic.

Amythyst lid with original clay face


Each jar comes with a scroll with ingredients and magical properties listed

If you would like to read more of the Practical Magic inspired blog posts, please just click on the button at the top of my blog on the right hand side called "Practical Magic Blog Party"

Stumble Upon Toolbar