Showing posts with label Method. Show all posts

Friday, October 14, 2011

OIL MOSAIC COLLAGE


OIL MOSAIC COLLAGE

Oil mosaic collage

I realize that the title could make you think there should be a comma in-between each medium listed in my title of this post but it really is a description of a new method I have invented.

Close-up of face

Method:
I painted a face onto a wooden board I happened to have in my studio. I used the Renaissance oil method. Next, I collaged mosaic tiles onto the surface, giving the piece a rustic, yet rich look.

Close-up of tiles added

I just love the way she looks as part of this chair

She is not for sale at this time but I’m working on one I call “The Crone” that I will be posting soon.

The Crone

Stumble Upon Toolbar

Sunday, January 23, 2011

ANTIQUE WOODEN TRAY

ANTIQUE WOODEN TRAY

Benedetta

Benedetta

Although this very ornate antique tray does not fit into my decorating theme for most of my house, it will be perfect for my newly renovated Tuscany Suite. I’m having students stay here for an all-inclusive sculpture class this summer and I want to give them every possible luxury.

Benedetta-ornate wooden tray

Benedetta, (that is the name I am giving her because I believe that anything worth owning is worth naming) was very easy to create. I found the wonderful tray at the flea market. I used a digital image of a spirited gal I painted last year. I had named the original “Tess” She even has tattoos! There is something innocent about her face though and I knew I could convert her into a beautiful Italian girl. My friend, Chrystal, gave me some absolutely beautiful delicate lace that her mother had collected. I placed it around the digital image and printed it once again. I cut a few pieces of the lace and used gel medium to glue down the entire collage.

Side view

After the collage dried, I added Tim Holtz’s crackle paint, heated it with my blow dryer. Then I dabbled the entire piece with gesso to give it an even more antique look.

Benedetta with bath soaps

I’ll be on the lookout for 2 more trays for the other bedrooms that will be used during the class. In the meantime, the only decision left is whether Benedetta will be offering exotic perfumes, soaps or wine and delicious truffles from our local candy store, “Chocolate Paper.”

Benedetta with exotic perfume

Benedetta with chocolate candy and wine

If you are interested in reading more about the class, please check out my website at the top of my sidebar titled “Cheryl Dolby’s School of Sculpture.” There are videos of the Tuscany Suite, Tuscany Annex and Cabana Suite. I am visualizing a lavish ocean tray there. I’m happy to announce that I only need two more students! Perhaps you will join me here at my home, Woodloft.

Stumble Upon Toolbar

Friday, September 24, 2010

GODDESS MAGIC CREAMS INSPIRED BY PRACTICAL MAGIC

GODDESS MAGIC CREAMS INSPIRED BY PRACTICAL MAGIC

Goddess Magic Creams

Justina and Anna from Mistic-Majik have come up with a grand idea for anyone interested in showing their arts, crafts, decorating skills or other talents related to the movie or book called Practical Magic.

Before starting my post, I looked up the word magic. One synonym of magic is “enchantment.” I immediately thought about my Goddess Magic Creams. My customers seem to be enchanted by them so I thought perhaps my readers would like a tutorial or at least a method on how to create them.


Goddess Magic Cream with original clay face and turquoise

In a previous blog post I jokingly said I feel like Madam Curie whenever I start to concoct my Goddess Magic Creams. Sometimes I also feel like a witch as I siphon out, mix, grind, measure and jar them. As a sculptor, I never expected to be creating face and body creams but when I found some beautiful glass jars with lids, the inventive side of me kicked in.

Refill jar

I sculpted faces out of stoneware clay and added interesting embellishments to each jar. I experimented with various butters and oils and It took me over two years of research and development to finally decide my creams were worth selling.

Ingredients

I finally settled on almond oil, shea butter, bees wax, glycerin, silk protein, grapefruit seed extract, panthenol, essential lavender oil, emu oil and coconut oil. and water AND..a "Magical" ingredient.

More ingredients

I heat the oils and butters until they are completely dissolved. I also heat the water. Next step is to whirl the mixture in a food processor set aside strictly for the creams. I first add the liquid ingredients and water, then slowly drizzle in the heated oils and butters.


Oils being heated

I place the cream in a freezer for about an hour. I then re-whip it in the processor until it becomes creamy and fluffy. This is probably the hardest part because everything I’ve done prior to this step depends on what the texture will be like. I was disappointed by a bad batch when I first started making the cream but seem to have perfected it now. The cream batches are now consistent.

Cream after being whipped

The one ingredient I am missing right now, and here is where the magic comes into play, is the Holy Water that I collected from the Sacred Grotto of St. Bernadette from Lourdes, France. I brought the water back over three years ago and decided to add small portions of it to my cream. I was surprised that the water lasted so long! Every time I got to the point where I had only a dribble of water left, one of my family members or friends would bring me one of the souvenirs of the water I had given to them asking if I’d like to have it back for my cream.

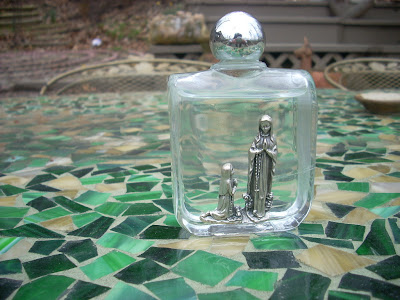
One of the bottles of Holy Water from Lourdes

Refill jars

My customers have told me some pretty amazing stories concerning my cream. Some say it gets rid of hives, other tell me that aches in their hands disappear when they use it. While not trying to sound like a snake oil doctor, I will just say that there is a good chance the creams are…..magic…

Hematite lid with original clay face

I will be concocting more of my Goddess magic Cream this winter with hopes that someone will appear with a bottle of the water from Lourdes, since I’m now completely out. Perhaps you’d like to judge for yourself if they are indeed... magic.

Amythyst lid with original clay face


Each jar comes with a scroll with ingredients and magical properties listed

If you would like to read more of the Practical Magic inspired blog posts, please just click on the button at the top of my blog on the right hand side called "Practical Magic Blog Party"

Stumble Upon Toolbar

Monday, August 23, 2010

ORGANZA COLLAGE BOX

ORGANZA COLLAGE BOX

Organza Collage Box

Terri Kahrs of Pringle Hill Studio was gracious enough to share an image of one of her captivating women. I fell in love with this one and experimented using a lot of different techniques.

Close-up of part of the collage

First I found an interesting picture in a magazine of a woman with her hand outstretched. I used Never Dull, available from WalMart, and rubbed it over the surface so that I could erase all but part of the hand. I also did the same thing to a face I found in another add. I took photos from the Cliffs of Moher and Ross Castle, places I had just visited in Ireland, and created a digital image of them using organza and attached them to an old wine box I had in my studio, using gel medium.


Next, I took Terri’s picture and ran a digital print of the beautiful lady on organza cloth. Once again, I overlayed the organza cloth onto the box with gel medium. I wanted her to have a ghostly look and the organza was perfect for that effect.

I added one of my stories from my book, She Who Whispers, titled Morning Song. I then used tissue paper that I soaked in gel medium that I thinned with water and placed it onto the box in various places. I drizzled gesso around the collage and painted the box with more gesso. I attached gold and silver mosaic pieces around the edge and added an old watch part.

Another close-up

Before tiles are added

I will use the box to house some of my acrylic paints. I’m really pleased with the image of this enchantress. I just had cards made from a close-up of the collage. There’s many other ways I plan to use her. Again. Thanks so very much to Terri!

Cards I had made of the collage

Side view of the finished box

Stumble Upon Toolbar

Sunday, April 4, 2010

ENCAUSTIC WAX COLLAGE

THE UNFOLDING


This is the second in my heavily textured encaustic wax collage series. I used oils for the face and crackled the surface of the collage. I crumpled tissue paper and immersed it into gel medium. I then spread the paper over much of the surface. I painted encaustic wax over some of the area. I did not iron it in, as I do my encaustic Gypsy Woman Journals. I was extremely happy with my collage, yet, something was missing. I decided to write one of my stories onto the lower part of the collage. One problem with that is the fact that no matter how hard I try, I cannot produce calligraphy-like handwriting. I even took a course on calligraphy. I bought all the pens, nibs etc. and practiced for an hour daily. It seemed to work fine for awhile and then, before long, I reverted back to my old chicken scratch. Even so, I decided to scratch out one of my stories from my book, She Who Whispers. Sometimes, when I view the collage with half open eyes, I actually see ancient script. As though the writing came from some secret society. (I’m laughing here a bit)

Close-up of The Unfolding

The story I told was of "The Unfolding". Just in case you can’t read it on my collage, (even when you double click it to enlarge) I’ve typed it in below.

"The Unfolding"

So long in the cocoon...and now she was free..free to fly..fly away ..because they had been called to the world, and she had been called..to herself.....

Cheryl Dolby

Another view

I wrote "The Unfolding" with women in mind. Women who have given and given until they could give no more. When the child finally leaves the nest, you would hope the mother would be free. They have chosen their own lives now, away from her, away from home. This certainly isn’t true in all cases though. Many women must wait entire lifetimes for their freedom. It doesn’t always come from the child or children leaving either. Sometimes it is a divorce or even just a state of mind. We can choose to be free of the worries our children, and others, bestow upon us.

I am offering The Unfolding for just $200. She is 14"w x18"h by 1 1/4". I created her on canvas. I have just placed her on Etsy so that you can view her more clearly. She can be purchased there with the help of Paypal or alternately , she can be purchased directly from me. Just e-mail me. I take all of the major credit cards including Discover Card, checks or Money orders. Thank you.

Stumble Upon Toolbar

Sunday, March 21, 2010

B-DAZZLED CROCS!

B-DAZZLED CROCS

B-dazled crocs

You would think that after attaching 23,000 beads, bangles and bows to my art car, B-Dazle, I would have thought of something exciting to do with my beloved crocs wouldn’t you?

B-dazle-art car with 23,000 beads

It took Lisa, from Eclectic Visions, to trigger the idea for B-dazzling my crocs. Now, I must tell you, this was no small job. If my shoe size was an adorable size 6, it would have been a lot easier. But, at size 11 (I am just short of 6’ tall so I need a good “understanding.”) it did take me a considerable amount of time.


Another view of b-dazled crocs

I used the same glue I used on B-dazle, which is an aquarium glue and waterproof. I attached simple beads purchased at one of the craft stores. I didn’t want to add anything jangly because I knew it would just get in the way, you know, like swatting flies. I wear the crocs as slippers and to my swimming classes. And, of course, I drive B-dazle down to the Farmer’s Market in Roanoke where I sell my work, so my new crocs will be a perfect match!


B-Dazle and matching crocs


Stumble Upon Toolbar

Tuesday, February 16, 2010

OCEANA

“OCEANA”

Oceana


Oceana

As she was standing at the edge of the ocean she
could hear the waves chanting
their familiar song.

“Come to me, I am geater than you, I am wiser than
you..I am the one.”

She resisted once again. How long could she
continue to resist…How much longer before she
embraced her larger self,
her destiny,
her soul…
..the sea….

~ Cheryl Dolby ~

Decorating cigar boxes became a passion of mine a few years ago. There is an unbelievable story relating to my finding a huge stash of them at one of my art show adventures. If you’d like to read about it or would like to see some of the boxes I created from that stash, please click here.

As I have said in previous posts, I wrote a book titled She Who Whispers, which includes about 44 of the stories I give my finished pieces. I almost always sculpt women since I just can’t seem to come up with a good male face, and I write all women's stories (we have a lot to tell). I use the story of Oceana quite frequently since this is exactly how I feel about the ocean and I am drawn there once a year to get my “fix.” Customers have asked me to expound on Oceana’s story so I finally gave a possible scenerio concerning her life and included it in my book, Layers. You can click here to go to my etsy site where you can read more about my book.

Before I ever started using the very difficult, labor-intensive art form of fresco, I developed "fres-goe's." This is the name I have given to these special pieces of art. Below is the story and explanation that I attach to all of my "fres-go" pieces.

(Click to enlarge)

I created this particular "fres-go" on a a plain white tile. It fit nicely on the top of the cigar box. I added iridized glass tiles to the right side and large ball feet. I added the Oceana story to the inside top of the box and placed a heavy brocaded type material to the base.

Interior view of Oceana box

I painted it with a layer of Modge Podge and then applied a crackle texture to it. I experimented with using a layer of paint, then Elmer’s glue and while that glue was still wet, I gave it another layer of paint. This gave the piece a look of barn peeling. While this may be a good application for some projects, this was not the look I wanted. By using a tan crackle solution and then applying another light shade of green acrylic, I finally got the result I was striving for. The box now appears more sea foam and sand and has the feel of the ocean.

Painting the cigar box

I think she came out pretty nifty. Oh, and by the way, feel free to download a copy of my poem to use any way you’d like, just give me credit ok?

Unsatisfactory barn like texture

The desired crackle effect


Stumble Upon Toolbar

Thursday, December 17, 2009

ANGEL TREASURE BOX

ANGEL TREASURE BOX


NOSTALGIC CHRISTMAS DECORATIONS


Time to open the Christmas Angel Box.


One day, way back in about 1973, I found an enchanting pattern for Victorian dolls. Back then, patterns were sometimes placed in the inside sections of magazines. I can’t recall which magazine it actually was in but when I first saw them, I knew I wanted. to embroider a set of these delightful dolls. I turned them into tree ornaments for each of my children.


Embroidered Victorian ornaments, representing each of my children


Kelli's ornament


Charlie's ornament


Kirsten's ornament


Cam's ornament


I even embroidered the back side


These Victorian ornaments have been placed on our Christmas tree every year. I can’t even imagine decorating a tree without them. This year I had an idea as I took them out of the box I made for special ornaments.


Why not create another set for my grandchildren? Tightly woven off white material can be purchased from a fabric shop. Embroidery thread is also easily found in every color imaginable. Stamping was not heard of when I created the original dolls but now there are hundreds of exciting rubber stamps available. Stamps of children or adults, not necessarily Victorian this time, can be used with an ink stamping pad to create the base to embroider.


Linen fabric, rubber stamps, pad and embroidery thread.


The front and back can be stamped and sewn together and then embroidered.

I have started making the ornaments but it is doubtful I will finish them for this Christmas since there is so much yet to do.


There is something almost supernatural in the way the week before Christmas unfolds. Each year is magical in it’s own way. I hope to capture a bit of that enchantment to share with you. I know most are busy creating their own special Christmas but I hope you will visit me again in a few days for “The Magic of Christmas.”


Stumble Upon Toolbar