Showing posts with label materials. Show all posts

Monday, April 18, 2011

FRIDA KAHLO!

FRIDA!

FRIDA MANIA!

Frida Kahlo Rivera-mixed media original oil collage

Mexican icon, Frida Kahlo, has been represented throughout the years in many different mediums. I never really thought too much about her until a few years ago when I had the pleasure of taking a tour of Mexico. While in Mexico City, I visited the museum of Diego Rivera. It was there that I became attracted to the busy look of his fabulous paintings. Frida attended the renowned National Preparatory School where she met Diago. He was painting a mural in the lecture hall. They later married only to have an on again off again marriage. I started to study their lives and now I see what all the fury concerning Frida is about.

Close-up

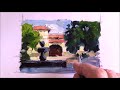
Diego Rivera's mural in Mexico City, Mexico

Magdalena Carmen Frida Kahlo was born in 1907 in Mexico City. She contracted polio as a child and walked with a limp because of the damage to her leg and foot. As luck would have it, she was forced to leave her study of medicine to begin painting after a terrible street car accident immobilized her. Being forced to remain in bed in excruciating pain for long periods at a time, she chose to explore the world of art and became quite famous.

Frieda is richly decorated in vibrant oil color and embellishments

In creating my own Frida oil painted collage, I decided to vicariously put myself in her shoes, pick up her palatte and see through her eyes as I painted. I chose to create a painting in the fashion she would have used. She said when interviewed, “I paint myself because it I know myself better than anyone else.” She created 143 paintings and of those 55 are self portraits.

Crackled flowers

I found an old frame at the flea market and painted it in bright Mexican looking colors. I glued digital images of flowers behind the area where I roughed in the face. I modge podged the flowers, crackled them and then oil painted several in and around the crackles to create depth. I then finished painting her face, neck and dress in oils.

Wooden palette

I was given a beautiful palette for Mother’s Day last year, but after taking an oil painting class, I found that it is much more cost-effective and much easier to use the disposable palettes. I decided to use my wooden palette as a focal point in the painting. I hand wrote two of Frida's quoted sayings in Spanish. I also added two paint brushes that were my father, James Galloway’s. He was a well known landscape artist. I inherited all of his art materials when he passed away several years ago. Some of the brushes were dried out and I wanted to put them to good use.
>
Beautiful painting found at resort in Playa Del Carmen, Mexico

Another busy but beautiful painting

I wanted the painting to look very much like one Frida would have created of herself. I was also influenced by two paintings in the hotel where I stayed in Playa Del Carmen this past winter. Yes. "Busy" is in with the old Mexican artists and mine is certainly no exception.


Finished Frida oil collage measuring 36" wide x 66" high! She's larger than she looks here.

My Frida is standing rather stoic (that is the way Frida usually painted herself,) with the bright flowers and traditional Mexican dress she most often chose to wear. The look she conveys in her paintings is of a surrealistic nature. She said. “I never painted dreams. I painted my own reality.”

I printed her biography in Spanish and crackled it, placed it on the dress, used gesso to splash over it and little by little…she started to come to life.

She was a long time in the making but finally I can present her for show. I hope you like her. I plan to place her in my kitchen for now. I just know I’ll love the color and life she will add.

FRIDA MANIA!


Frida sculpture and oil collage shown together in my studio

I used lavish embellisments to adorn her hair and neck

Now..here is where the real Frida mania comes in. I didn’t stop at the painting. I also sculpted Frida, I created journals of her, placed her on my “gypsy woman" cloak hangers, made art paper dolls and various other Frieda items. I’ll be doing a post of them soon, but for now, here is a picture of the sculpture I created of her, which is for sale. I have priced her at $300. She is 23” tall and 12” wide. I can ship her anywhere and give you an estimate on shipping price. Please e-mail me if you are interested and we can go from there.


Another view of Frida sculpture


And yet another view

Stumble Upon Toolbar

Sunday, January 23, 2011

ANTIQUE WOODEN TRAY

ANTIQUE WOODEN TRAY

Benedetta

Benedetta

Although this very ornate antique tray does not fit into my decorating theme for most of my house, it will be perfect for my newly renovated Tuscany Suite. I’m having students stay here for an all-inclusive sculpture class this summer and I want to give them every possible luxury.

Benedetta-ornate wooden tray

Benedetta, (that is the name I am giving her because I believe that anything worth owning is worth naming) was very easy to create. I found the wonderful tray at the flea market. I used a digital image of a spirited gal I painted last year. I had named the original “Tess” She even has tattoos! There is something innocent about her face though and I knew I could convert her into a beautiful Italian girl. My friend, Chrystal, gave me some absolutely beautiful delicate lace that her mother had collected. I placed it around the digital image and printed it once again. I cut a few pieces of the lace and used gel medium to glue down the entire collage.

Side view

After the collage dried, I added Tim Holtz’s crackle paint, heated it with my blow dryer. Then I dabbled the entire piece with gesso to give it an even more antique look.

Benedetta with bath soaps

I’ll be on the lookout for 2 more trays for the other bedrooms that will be used during the class. In the meantime, the only decision left is whether Benedetta will be offering exotic perfumes, soaps or wine and delicious truffles from our local candy store, “Chocolate Paper.”

Benedetta with exotic perfume

Benedetta with chocolate candy and wine

If you are interested in reading more about the class, please check out my website at the top of my sidebar titled “Cheryl Dolby’s School of Sculpture.” There are videos of the Tuscany Suite, Tuscany Annex and Cabana Suite. I am visualizing a lavish ocean tray there. I’m happy to announce that I only need two more students! Perhaps you will join me here at my home, Woodloft.

Stumble Upon Toolbar

Sunday, April 4, 2010

ENCAUSTIC WAX COLLAGE

THE UNFOLDING


This is the second in my heavily textured encaustic wax collage series. I used oils for the face and crackled the surface of the collage. I crumpled tissue paper and immersed it into gel medium. I then spread the paper over much of the surface. I painted encaustic wax over some of the area. I did not iron it in, as I do my encaustic Gypsy Woman Journals. I was extremely happy with my collage, yet, something was missing. I decided to write one of my stories onto the lower part of the collage. One problem with that is the fact that no matter how hard I try, I cannot produce calligraphy-like handwriting. I even took a course on calligraphy. I bought all the pens, nibs etc. and practiced for an hour daily. It seemed to work fine for awhile and then, before long, I reverted back to my old chicken scratch. Even so, I decided to scratch out one of my stories from my book, She Who Whispers. Sometimes, when I view the collage with half open eyes, I actually see ancient script. As though the writing came from some secret society. (I’m laughing here a bit)

Close-up of The Unfolding

The story I told was of "The Unfolding". Just in case you can’t read it on my collage, (even when you double click it to enlarge) I’ve typed it in below.

"The Unfolding"

So long in the cocoon...and now she was free..free to fly..fly away ..because they had been called to the world, and she had been called..to herself.....

Cheryl Dolby

Another view

I wrote "The Unfolding" with women in mind. Women who have given and given until they could give no more. When the child finally leaves the nest, you would hope the mother would be free. They have chosen their own lives now, away from her, away from home. This certainly isn’t true in all cases though. Many women must wait entire lifetimes for their freedom. It doesn’t always come from the child or children leaving either. Sometimes it is a divorce or even just a state of mind. We can choose to be free of the worries our children, and others, bestow upon us.

I am offering The Unfolding for just $200. She is 14"w x18"h by 1 1/4". I created her on canvas. I have just placed her on Etsy so that you can view her more clearly. She can be purchased there with the help of Paypal or alternately , she can be purchased directly from me. Just e-mail me. I take all of the major credit cards including Discover Card, checks or Money orders. Thank you.

Stumble Upon Toolbar

Sunday, March 21, 2010

B-DAZZLED CROCS!

B-DAZZLED CROCS

B-dazled crocs

You would think that after attaching 23,000 beads, bangles and bows to my art car, B-Dazle, I would have thought of something exciting to do with my beloved crocs wouldn’t you?

B-dazle-art car with 23,000 beads

It took Lisa, from Eclectic Visions, to trigger the idea for B-dazzling my crocs. Now, I must tell you, this was no small job. If my shoe size was an adorable size 6, it would have been a lot easier. But, at size 11 (I am just short of 6’ tall so I need a good “understanding.”) it did take me a considerable amount of time.


Another view of b-dazled crocs

I used the same glue I used on B-dazle, which is an aquarium glue and waterproof. I attached simple beads purchased at one of the craft stores. I didn’t want to add anything jangly because I knew it would just get in the way, you know, like swatting flies. I wear the crocs as slippers and to my swimming classes. And, of course, I drive B-dazle down to the Farmer’s Market in Roanoke where I sell my work, so my new crocs will be a perfect match!


B-Dazle and matching crocs


Stumble Upon Toolbar

Friday, February 26, 2010

MORNING SONG

MORNING SONG

"Morning Song"


SOLD. THANK YOU MINDY!


My story, “Morning Song” came to mind as I added the finishing touches to this original stoneware clay sculpture. She has a look of longing in her eyes, as though she is remembering times long ago. She is part of a series I call "Daughters of Antiquity."

I used items found in my studio that I had saved, seemingly, just for her. Wherever I travel, I search the back streets for unusual items that I tuck away for just the right application. I adorned Morning Song with a Murano glass piece that I brought back from Venice. It was actually the top of a pen that had broken on the transit back. I found an Indian copper bell that fit her to a T.

While visiting friends in Hollywood, California, I was lucky enough to go to the Hollywood Flea Market. What fun this was. There was everything imaginable for sale there, even models walking around with feathered bras for sale! I found a copper piece a Mexican man was crafting there at the market. It blends perfectly with the colors in the garment, which is an old ethnic looking dress. I have a lot of beadwork hanging from my studio windows and the green and blue strand of beads I found there seemed perfect for her.

Studio window, full of beads

Here is her story.

“ Morning Song”

She woke up this morning feeling different.
She heard the sounds of this morning and
yet the sounds of many other lifetime mornings
were returning. She heard the infinite sound
of distant runic bells, a call to alms, merchants
voices echoing over the river Nile, sheep
bleating on a pastoral hillside, roosters, guns,
flutes, chimes, laughter, weeping..for she had
heard all these mornings and she had heard
all these sounds before. It was as if they were
all becoming one great sound...one great
morning..this morning....and she knew that all
the returns of mornings purpose was to teach
her the uniqueness and significance of this
morning...of now.

~Cheryl Dolby~

Close up of Morning Song sculpture, part of "Daughter of Antiguity" series

Stumble Upon Toolbar

Wednesday, February 24, 2010

Grandmother Tree Paper Art Doll

GRANDMOTHER TREE PAPER ART DOLL


"Grandmother Tree" Paper Art Doll

Creating paper dolls certainly is addictive. Today I decided to construct a paper doll by using my “Grandmother Tree” theme, which is really a series.

This series started many long years ago and I found through trial and error that it is a customer favorite. For my first “Grandmother Tree,” I sculpted a very large face out of stoneware clay and then mounted it on a large board that I covered with Melaleuca bark. The Melaleuca tree is grown in Florida and is the tree from which we obtain tea tree oil.

First in my "Grandmother Tree" series


Close-up of "Grandmother Tree"

Now, I create all types of Grandmother Trees in various sizes. The “trees” come with a story that I have written for them.

“Grandmother Tree”

The trees are alive! She wandered
into the garden early one morning
and she heard them speak to one another..
It was a language spoken on another
frequency..in another vibrational time
frame. They spoke of healing with power
and energy and of the relationship between
energy and matter.

She was drawn to an ancient Chinese
Elm and as she leaned her body next to the
base, somehow she felt immersed
in the tree and felt herself slip into the
tree..was one with the
tree and knew that she was the tree.....

~Cheryl Dolby~


Sillouette of "Grandmother Tree"

This particular doll is a bit busy, but then again, all the "Grandmother Trees" seem to be. I used distressed felt for the body, horsehair, reindeer fern and coir, which is coconut bark, and I sculpted the face out of paperclay. I guess you can tell that I’m still experimenting to find exactly the direction I want to go with my dolls. I have to say that I’m enjoying every minute that I have to work on them!

Stumble Upon Toolbar

Thursday, December 17, 2009

ANGEL TREASURE BOX

ANGEL TREASURE BOX


NOSTALGIC CHRISTMAS DECORATIONS


Time to open the Christmas Angel Box.


One day, way back in about 1973, I found an enchanting pattern for Victorian dolls. Back then, patterns were sometimes placed in the inside sections of magazines. I can’t recall which magazine it actually was in but when I first saw them, I knew I wanted. to embroider a set of these delightful dolls. I turned them into tree ornaments for each of my children.


Embroidered Victorian ornaments, representing each of my children


Kelli's ornament


Charlie's ornament


Kirsten's ornament


Cam's ornament


I even embroidered the back side


These Victorian ornaments have been placed on our Christmas tree every year. I can’t even imagine decorating a tree without them. This year I had an idea as I took them out of the box I made for special ornaments.


Why not create another set for my grandchildren? Tightly woven off white material can be purchased from a fabric shop. Embroidery thread is also easily found in every color imaginable. Stamping was not heard of when I created the original dolls but now there are hundreds of exciting rubber stamps available. Stamps of children or adults, not necessarily Victorian this time, can be used with an ink stamping pad to create the base to embroider.


Linen fabric, rubber stamps, pad and embroidery thread.


The front and back can be stamped and sewn together and then embroidered.

I have started making the ornaments but it is doubtful I will finish them for this Christmas since there is so much yet to do.


There is something almost supernatural in the way the week before Christmas unfolds. Each year is magical in it’s own way. I hope to capture a bit of that enchantment to share with you. I know most are busy creating their own special Christmas but I hope you will visit me again in a few days for “The Magic of Christmas.”


Stumble Upon Toolbar

Sunday, September 13, 2009

ENCAUSTIC WAX


ENCAUSTIC WAX


Completed encaustic wax journals

Have you ever thought about working with wax? Years ago, I started working with encaustic wax. I love the sensual feel the wax creates when I brush and iron it onto my paintings.

Encaustic wax medium

This week I am working on my “Gypsy Woman Journals.” The way that I create them is by using an artists’ sketchbook and one of my batiked or painted faces. I glue the paintings onto the covers of the books with Modge Podge.

Journal and encaustic wax iron

Once the glue has dried, I melt my special encaustic wax over a medium heat in an old pan. When the wax has melted, I paint it onto the cover with a medium bristle brush. I let this dry for a few seconds and then I iron it, using a steady hand and not too much pressure. I work quickly. I bought the appropriate encaustic iron but I believe any iron will probably work. Make sure it is one you won’t use again on your clothing though.

Encaustic iron

The next and last step, is to place yarn into the ring binders. I also tie fanciful ribbon or yarn along each rung. That’s it.

"Gypsy Woman" journal

The journals pictured below will go to either New Mountain Mercantile, In Floyd, Virginia or Center in the Square Gallery, here in Roanoke. I may even ask my art representative, Kayla Finley, to present these to members of her workshops. I will also take a few of them to the Roanoke Farmers’ Market to sell. I always envy the women who receive them as a gift. I can imagine fine calligraphy written into each one of them. Unfortunately, my handwriting is so bad that I must limit myself to my keyboard. I blame my bad penmanship on the fact that I had to write so fast during the years I was learning shorthand. I think that is a poor excuse but the only one I have!


“Gypsy Woman”, pictured below, is a painting I experimented with a few years ago. I love the way the wax looks placed over one of my frescos. In this case, I did very little ironing and mostly just painted the wax onto the surface. The wax acts as a preservative. It also as gives the painting a look of antiquity.


"Gypsy Woman" painting

Stumble Upon Toolbar